Printing your photographs at residence can get difficult and complicated relatively rapidly. Between selecting a printer and paper and problem-solving why the colours don’t appear to be what you see in your show, it may be overwhelming, particularly in case you are simply getting began.
Printing in-house doesn’t need to be a scary factor, although. Under, you’ll discover some important steps that will help you get began or get higher high quality out of your prints.
Desk of Contents
Selecting a Printer
To print at residence, the apparent first step is buying a devoted picture printer. Epson and Canon make a few of the finest out there. Concentrate on their images lineups and go for a tool with a excessive decision. It’s additionally vital to concentrate to what number of ink colours the printer has. Broadly talking, the extra ink colours out there, the extra correct your colours will likely be, so go for one with extra than simply CMYK colours, in case your funds permits.
The printer will decide how giant you’ll be able to print, so take into consideration what print sizes you desire to entry to. A regular printer will solely go as much as 8.5 by 14 inches at most. Vast format printers will enable 13 inches broad, or wider for even bigger printers. When you might solely need small prints now, additionally plan for the longer term considerably, since picture printers are an funding.
Selecting Paper
The printer additionally determines the standard of your prints, in fact, however the paper you select additionally has a big influence. There are some things to contemplate when deciding on picture paper, however end is likely one of the most vital components. There are three main finishes: Shiny, luster, and matte. Different area of interest finishes, similar to Pearl, exist, however most fall inside the three talked about.
Shiny paper, because the title implies, gives a high-gloss end. It leads to wealthy distinction and excessive shade saturation. However it’s vulnerable to reflections and reveals blemishes like fingerprints and dents very simply. Luster paper has some shine, however a lot lower than shiny. It handles reflections higher however nonetheless gives a pleasant quantity of distinction and shade saturation. Matte papers haven’t any shine; as a substitute, they appear to be artwork papers, similar to watercolor paper. They cover blemishes very properly and are available in a variety of thicknesses and textures, from easy to closely textured.
Which end is finest solely comes down to private choice and every picture. Some pictures are finest printed on shiny, whereas others will look higher on matte. Generally, determining which one you must use for a given picture takes trial and error.
Epson, Kodak, and Canon all make a spread of entry-level and pro-grade papers with quite a lot of finishes, from matte to extremely shiny. For a extra high-end different, Hahnemühle makes excellent papers excellent for fine-art prints. Its matte end papers are particularly glorious. Canson is one other improbable possibility for high-end high quality.
Epson Extremely Premium Luster is an extremely standard paper amongst photographers and has been one among my most used papers all through my images profession. It has some gloss (16 p.c at 60 levels) with out distracting reflections. It additionally has a pleasant weight and glorious shade. And it gives a pleasant steadiness of worth and high quality.
Calibrate Your Monitor
Earlier than printing, it’s vital to make sure that your monitor gives correct colours. In any other case, you might be shocked by the colours of your prints once they come out. Most calibration instruments make the method simple and fast, so that you don’t must delay printing too lengthy.
Put together the Information
As you get able to print, there are some file prep steps to arrange the photographs. First, flatten the picture when you’re working in a program that makes use of layers. The printer will do that routinely, however it could lead to modifications to the picture, leading to inaccurate colours. You’ll want to save a model of the file with the layers after which a flattened model so you’ll be able to return to the unique if you want to.
You additionally must confirm which shade house you might be utilizing. Coloration house considerably impacts the colours in your pictures, so utilizing the best one for a given state of affairs is essential. For printing, use both sRGB or Adobe RGB, relying in your printer. If you’re changing your shade house in Photoshop, it would flatten the layers, so you’ll be able to skip the step above if that’s the case for you.
Lastly, resize your picture. Set the picture to no matter measurement you need the print to be at 300 dpi.
Print Settings
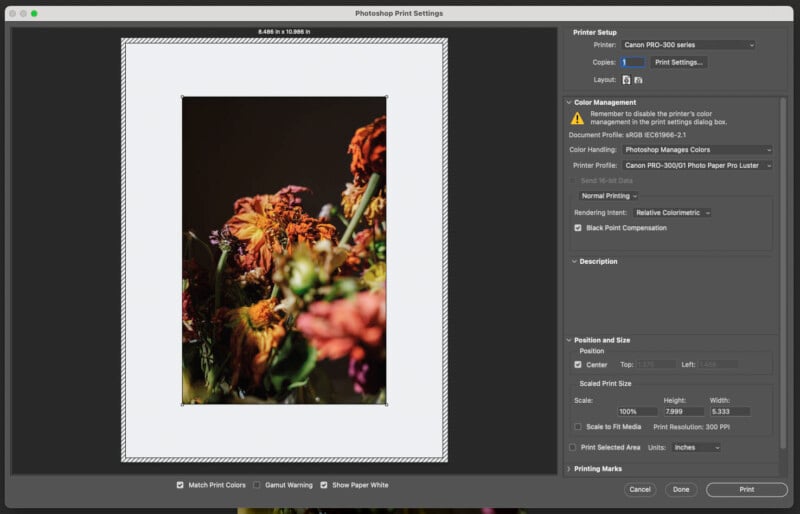
After you dial all of the above components in, it’s time to print. It’s finest (and best) to print instantly from Adobe Photoshop, Lightroom, or your most popular modifying program, as they are going to supply extra settings to get correct prints. Particular person settings rely on which program you employ; the examples under are particular to Photoshop, however there may be overlap with different applications.
Step one is selecting whether or not Photoshop or the printer manages colours. Usually, your finest wager for accuracy is to pick “Photoshop Manages Colours.” In case you use the identical model of paper as your printer, you may get good outcomes utilizing the Printer Manages Colours setting, although that’s not all the time the case. In case you use a third-party paper like Canson, it would be best to select “Photoshop Manages Colours.”
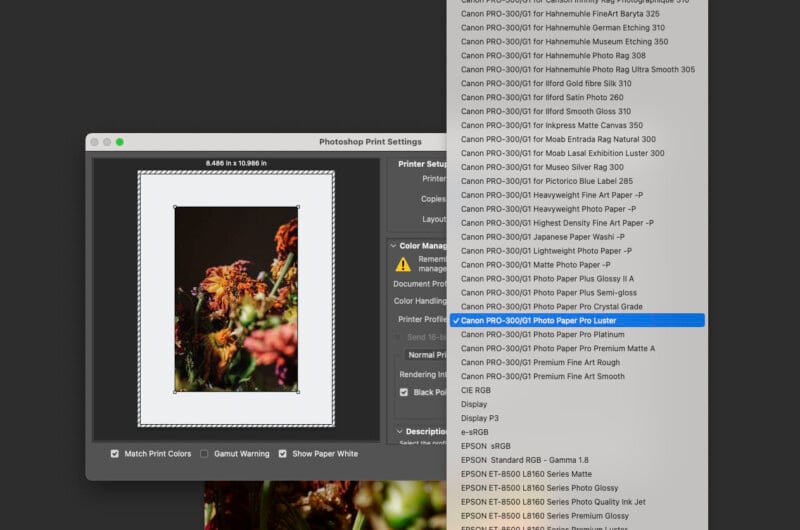
One of the vital crucial components in getting correct colours is utilizing the right ICC (Worldwide Coloration Consortium) profile to your paper. In case you use paper that’s the identical model as your printer, these profiles ought to routinely be put in if you set up your print drivers. In case you let Photoshop handle colours, you’ll select the paper profile within the Printer Profile. You’ll discover the paper selections within the Media part if you choose to let the printer handle colours.
The important thing right here is to pick the identical sort of paper you might be utilizing. In any other case, the colours will likely be off, probably considerably. For instance, when you use Canon Professional Platinum picture paper, choose Canon Professional Platinum within the print settings.
From there, just a few further elective settings could also be helpful. Rendering Intent determines how the colour administration system handles changing shade areas. Relative Colorimetric is the default, which adjusts out-of-gamut colours to the closest reproducible shade within the vacation spot shade house. It preserves extra colours than all however Absolute Colorimetric. Choose Perceptual for pure colours that is probably not correct to the way you edited. Saturation is finest for enterprise graphics and charts, not photographs, because it produces vivid colours at the price of accuracy. Lastly, Absolute Colorimetric doesn’t regulate colours past clipping out-of-gamut colours. It’s best used for proofing, not for last prints.
The final elective setting is the Black Level Compensation checkbox. With that checked, Photoshop will protect shadow element, simulating the total dynamic vary of the printer.

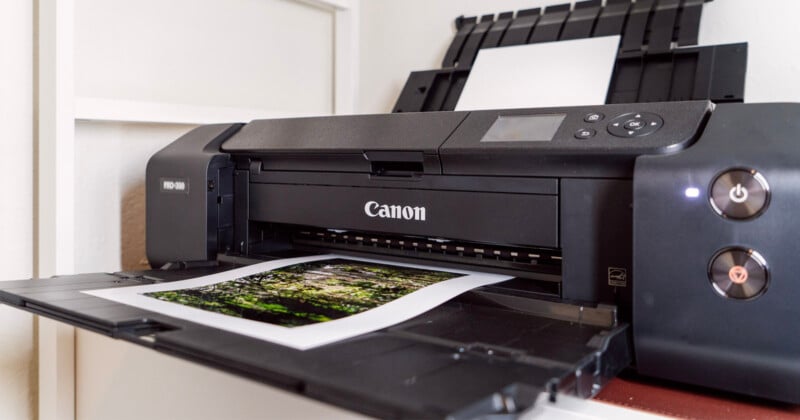
Load the Paper
Loading your paper is easy, however it’s completely essential to know which aspect is the entrance versus again of your paper. Picture paper has a printing aspect and a again. The printing aspect options particular coatings that take in the ink, whereas the again won’t. In case you print on the flawed aspect, the ink will pool up, run, and basically by no means dry (talking from expertise right here).
Some picture papers have textual content on the again to assist establish the printing aspect, however some don’t. Luster papers could be particularly laborious to inform except you look fastidiously. Additionally, take into account that some printers have you ever load the paper the other way up due to how the paper is pulled by way of the printer. Pay shut consideration to the way you load the paper and which aspect is the printing aspect.
Don’t Be Afraid of Trial and Error
Printing photographs is, sadly, hardly ever a precise science. Even those that have been doing it a very long time have points or resort to some trial and error to search out the best settings and paper for a given print. You’ll want to go into the method with glorious endurance and the willingness to strive issues and problem-solve when your print doesn’t look proper.
On the finish of the day, printing your personal photographs could be extraordinarily rewarding. You’ll have tangible copies of your pictures, which is all the time particular. Seeing a bodily model of your images can change your notion of your work, serving to you develop as a photographer and artist.


